


HOW TO BUILD YOUTH GROUP RISERS
If you've been around youth ministry long enough, then you've seen a youth room or camp that has risers of some sort in them. I love risers. They are versatile, functional, and great for getting a lot of students in a compact space.
When I designed my last youth group room in Nor Cal, I built permanent ones in the back. They worked perfect! So when it came time to design a new room on campus for our 7th and 8th grade ministry here at Journey and Christina- our junior high pastor- asked for risers, I was all in! So along with a team of some volunteers, we recently built some.
On a personal level, I sometimes love the diversion of a construction project from the work of ministry because the honest truth is... it's easier. The materials are static, the progress is obvious, and when you're done, you're done. Youth ministry is about none of those things. So a little construction project escape is soul rebuilding for me from time to time.
Here's a pic of 2 of the finished product side by side. We made 4 moveable risers in all, allowing for a lot of room configuration possibilities. This week it was set up with half the crowd facing the other half.
 |
| front view of 2 risers |
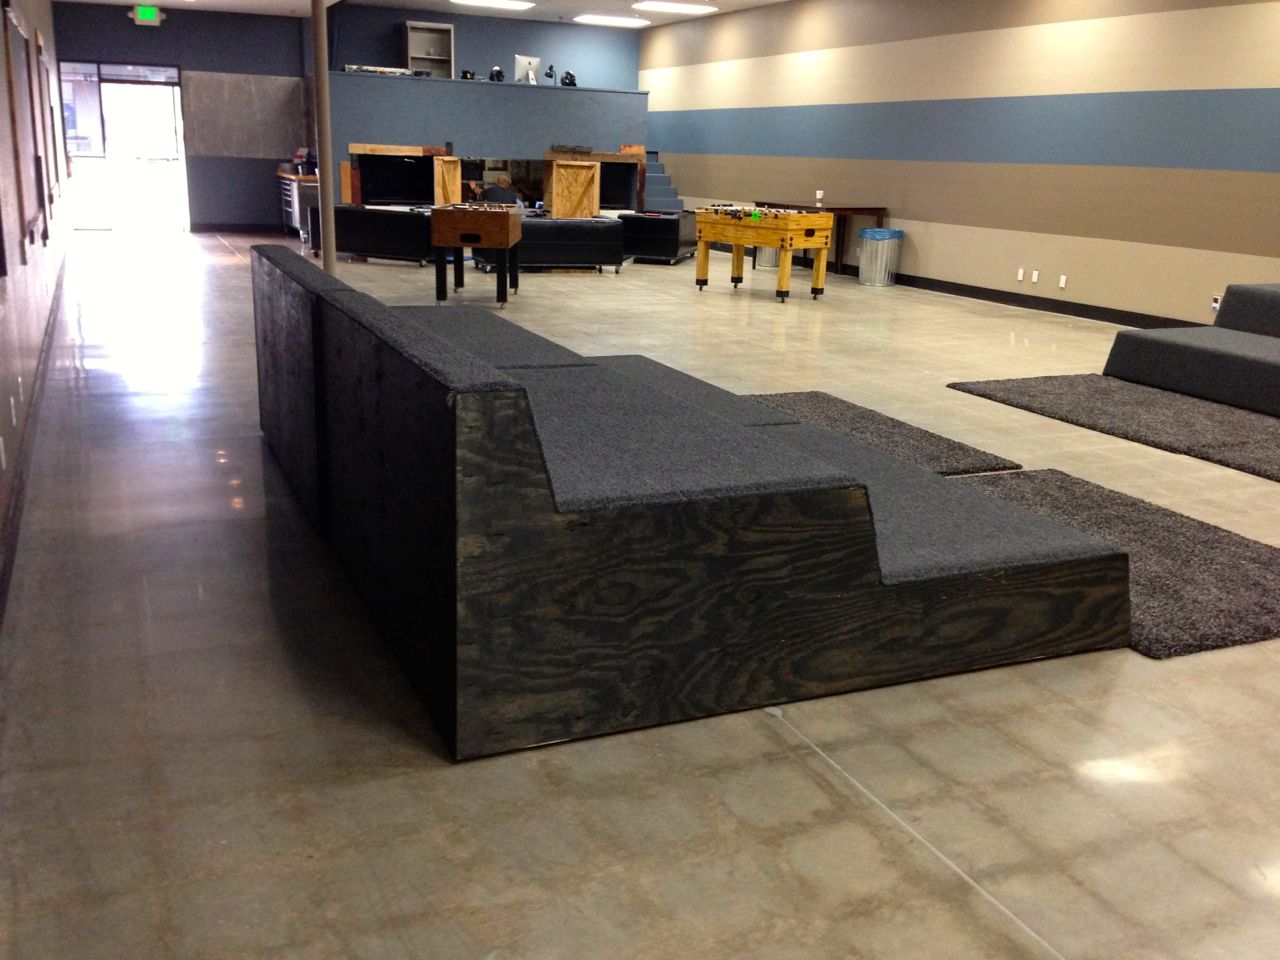 |
| side view, notice the front of the risers at like a 15 degree angle |
Each of the four moveable risers are 6 feet wide by 7'3"long by 36" tall. They are built strong enough so that students can stand, jump, sit or lay on them without the stairs flexing. They are essentially impossible to flip or break, no matter how many students you put on them. They are carpeted and padded for durability and comfort.
I didn't design them with plans... just did it off of a sketch. So a few people since have asked how we made them. I didn't want to take the time to draw out plans and such, but I did takes some pictures and try to explain the process here in case you want to sorta copy them.
START WITH SOME SKILLED LABOR & MATERIALS:
This is not the hardest project, but it will take some experience and confidence with building things to get r done right. You might try grabbing your basic carpenter or hiring some help if you're unsure.
Now give this instruction set to a carpenter at your church and print out the pictures.
BEGINNING THE LAYOUT.
Lay down three of the 2x6 boards for skids cut to 84.5" Long. (This is the width of 2 stair treads at 39.5" plus the width of the 2x6 wall) Lay them flat on the ground and parallel to one another with the outside skids 6 feet apart and the center skid 36"OC.
BUILD THE WALLS: finished height (including the 3/4" plywood tread on top and 2x6 skid below) will be 12" for the lower step, 24" for the middle step, and 36" for the 2x6 back wall. All walls will be 72" long.
The breakdown looks like this:
Build 3 short 2x4 "walls" w/16"on center studs. Each wall will be 72" by 9.75" high.
Build 3 medium 2x4 "walls" w/16"on center studs. Each wall will be 72" by 21.75" high. Also, you may want to use a 2x4 brace to permanently square up at least one of these walls to keep the riser plumb in the center. You can see the angled brace in the pic below.
Build one tall 2x6 "wall" w/16"on center 2x6 studs. It will be 72" by 34 1/2" high. This wall has no plywood on top and serves as the back and last step of sorts as well. It's finished height including the skid is 36".
 |
| bottom of risers showing 2x6 back wall, 3 middle step walls and 3 front step walls- all mounted on three 2x6 skids. |
 |
| Riser on edge. Note 3 skids and various "internal walls" |
MOUNT THE WALLS TO THE SKIDS:
Per the above pictures, and after you ensure the skids are square, mount the walls to them with screws and liquid nail (especially if you're going to be moving them around). The 2x6 tall wall goes on one end and a 2x4 short wall on the other. Each stair tread is 39.5" deep by 72" wide and has 3 walls under it. One wall on each tread edge and one down the middle for support.
SHEET THE BACK WALL:
Now sheet the outside of the tall 2x6 back wall with 1/2" plywood. This is the finished riser back.
MOUNT THE RISER TREADS:
The stair tread or riser treads are 3/4" plywood. I cut the plywood to 39 1/2" x 72" wide. This will leave you with with a 36" x 72" finished riser tread. 3 1/2" will be lost due the the 2x4 wedges we add to create the back rest angle to each step face. Wedges are described next...
MOUNT THE ANGLED WEDGES TO CREATE THE STAIR TRED BACKS.
Cut 2x4 wedges the height of your various steps. If you did this right, they should all be identical, about 12" high. I simply cut them and then tapered them from 3 1/2" at the bottom nearest the tread to nothing at the top. The use a finish nailer and glue and mount them to the top of the 3/4" decking and the front of every stud in the walls, including the front end of the bottom step so people can sit on the floor and lean against it comfortably too. The angle is not as critical as it is that they are identical. The angle in this design will be about 15 degrees and is a nice angle to lean against however.
 |
| bottom of middle stair tred wall. You can see one of the wedges in the center of the picture here and the plywood sheeting too. |
FINISH THE SHEETING:
Sheet the remaining surfaces with 1/2" plywood. First sheet the front of the 3 riser treads and then the outer 2 sides, paying attention to keeping the riser plumb and square as you go.
PAINT: Stain or paint your exterior plywood as you desire. This is really hard to do if you wait till after your carpet and will likely get paint on the carpet in the process if you do it last.
CARPET THE RISERS:
Using a pneumatic stapler, staple down a thick pad, running it up the front of each riser and across the top of each tread, leaving it back about an inch from all edges so the carpet can be flush mounted.
Now cut the carpet to width, leaving an extra several inches on each side to fold under. It's also ok to leave it long and do this as you go. But regardless, beginning at the top of the finished 36"- 2x6 wall, turn the carpet under itself and staple it like crazy every 2 inches along the edge. Carefully begin to work your way down the front edges, pulling the carpet tight and stapling and cutting the carpet as needed as you go. NOTE: Never put a staple in the open field of the carpet, only along the edges or the seem between the 2 stairs. Because of the pad, you'll see every staple you leave in the field and it will look bad. Trust me.
 |
| carpet turned on itself and stapled |
 |
| view of the carpeted edges. |
MOUNT SOME WAY TO MOVE THEM:

Ok. Well I hope that was helpful. If you have questions, feel free to drop an e-mail or question in the comments and I'll be happy to help out if I can.
Good Luck and happy riser building to you!

0 comments:
Post a Comment